Intents
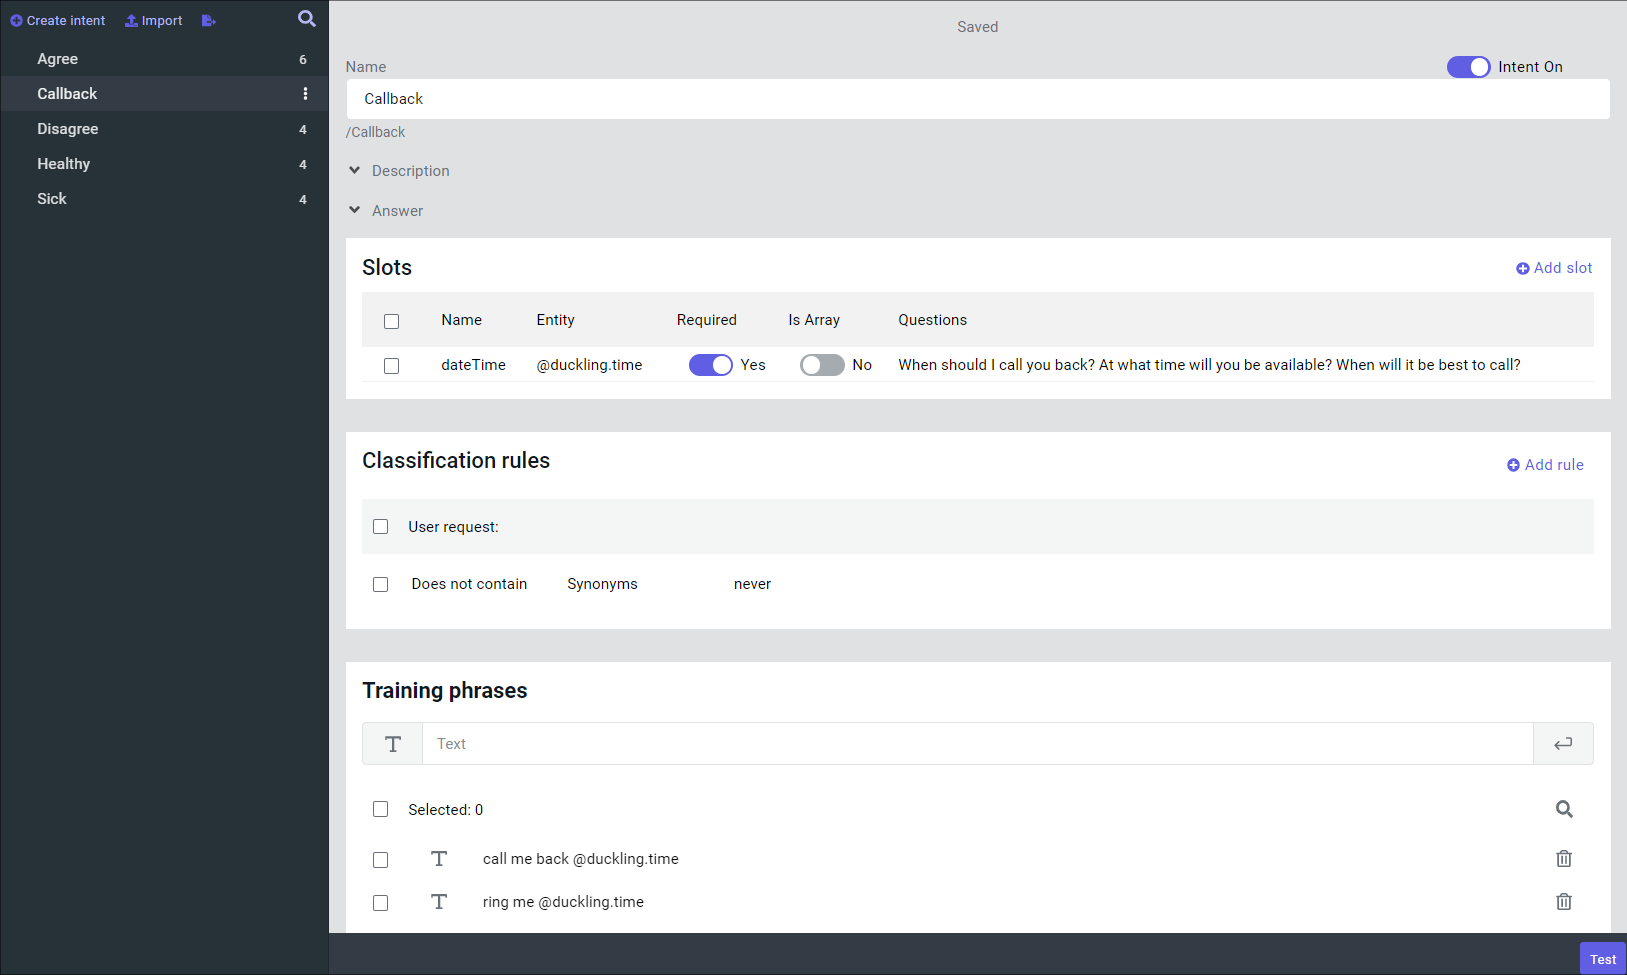
Intents are the fundamental units underlying the NLU service which represent the intentions expressed in user requests. Each intent is a combination of:
- User intention metadata.
- A set of phrases and/or patterns for training the classifier to understand this intention.
- Information on slots — entities which specify the intention.
Intent creation
Open a project and select CAILA → Intents in the toolbar. You are now in the project intents menu.

Click Create intent and fill out the intent data. Only the Name field is required.
| Field | Description | Note |
|---|---|---|
| Name | Intent name. | Under the input field, you can see the full path to the intent in the project intent tree. This path is calculated automatically and is used to reference the intent from the script. |
| Description | An additional comment to the intent. | |
| Answer | The default reply to the intent. | You can reference this reply from the bot script as $context.intent.answer. |
The toggle next to the name input field enables or disables the intent. Disabled intents are ignored by the classifier.
Training phrases
In the Training phrases section, you can add phrases and/or patterns which will be used for training the classifier to recognize the intent.
To add a new phrase to the training set, enter the phrase into the input field and press Enter. You can search for training phrases by clicking . Tick the checkboxes to the left to select and delete unneeded phrases from the set.
If you’re not satisfied with how the trained classifier recognized the intents:
- Increase the set quality. Follow the recommendations from the How to train intents article.
- Set other thresholds for training phrases and patterns in the
chatbot.yamlconfiguration file.
Using patterns
Phrases are the default way to train the classifier, but you can also use patterns to write formal descriptions of phrases matching a specific intent.
The syntactic features of patterns used in intents include all basic and most advanced pattern elements, with a small number of exceptions:
The
$morphpattern and mappings like(one:1/two:2)are not supported.Instead of named patterns
$patternand entities$entity<>, you should use CAILA entities.cautionCAILA entity names start with@.
Paraphrasing training phrases
If you don’t have any training dataset at hand, you can use the built-in paraphrasing tool. It can help formulate phrases with a similar meaning and reduce the overhead needed to create a training set. You won’t need to think up training phrases on your own, taking into account many different ways of saying the same thing.
When entering a training phrase, click in the rightmost part of the field to generate its paraphrase. If you don’t like the result, you can try again — the original phrase will be paraphrased anew. Note that if you remove the cursor from the input field or edit the result, the new text will be paraphrased next time instead of the original one.


Batch phrase insertion
Instead of adding each new training phrase one by one, you can construct the training set in your favorite text editor, then paste the whole set into the input field and press Enter.
Slots
Slots are entities mentioned in the initial request or during request clarification so that it can be fulfilled. The process of requesting this data is called slot filling.
Click Add slot and fill out the slot parameters:
- Name is the slot name.
- Entity is a system or user-defined entity defining the slot data type.
Customize the following parameters if necessary:
- Required: enable this toggle if the intent cannot be processed with this slot unfilled.
- Is Array: enable this toggle so that all entities of the matching type are placed into the slot as an array.
- Questions: specify the questions asked by the bot to clarify unfilled slots.
Classification rules
Classification rules allow you to set additional conditions for intent recognition. Use classification rules to select entities or configure patterns or synonyms which should always be present in or absent from user requests.
Classification rules are not a replacement for training phrases. Their most significant use case is for intents which are close in meaning, trained on similar sets of phrases, and are often mixed up during recognition. In this case, rules can help the classifier better distinguish between such intents.
Click Add rule and fill out the parameters:
- Contains / Does not contain
- Entity / Pattern / Synonyms
Depending on the selected rule type, an additional field will appear where you can:
- Select an entity from the list of entities enabled in the current project.
- Enter a pattern or a list of synonyms without converting them to a separate entity.
Nested intents
Intents can be nested into one another. Click next to the intent name and select Create nested intent. Intents can be nested to an arbitrary depth.
Note that nesting doesn’t affect intent recognition in any way. Nesting can help organize intents into a hierarchy and group similar intents together. This makes it easier to navigate and edit them.
All intents form a tree structure shown on the sidebar.
The tree nodes are sorted alphabetically.
Next to each node, the / character delimits the number of training phrases in the current intent and that within all nested ones.
How to use intents in the script
Intents supplied with the necessary data can be used to trigger states in the bot script.
Refer to the local intent/intentGroup or the global intent!/intentGroup! tag reference to learn how.
state: Hello
    intent!: /Greeting
    a: Hello there! How can I help?

    state: Courses
        intentGroup: /Courses
        intent: /Courses
        a: Are you interested in our courses? I found the answer for you.
        script: $faq.pushReplies();

    state: NoHelpNeeded
        intent: /Negative
        a: If you have any questions, don’t hesitate to ask me!
intent or intent! together with intentGroup or intentGroup!,
the state triggering priority can change.